

Diorama cards are wonderful little creations that allow card makers to build up a three dimensional scene using a few simple folds and a couple of pieces of cardstock. There are several different ways to create these cards, and some of the more complicated methods have a number of layers to give even more depth to the finished product.
Today I want to show you a nice simple card that folds flat for postage. I've done a basic tutorial that will give you the general idea of how to make these cards, followed by a more detailed tutorial on how to make the card pictured below.

1. Decide on how big you would like your finished card to be then cut two pieces of cardstock to the desired size. The finished card will be the same size as these two pieces of cardstock, so if you want your finished card to measure 6" x 6" then you need to cut your cardstock to that size.

2. Score each piece of cardstock at 1/2" and 1" from either side. Fold along the score lines and press the crease firmly as shown in the pictures below.


3. Use a die or a large punch to create a window in the centre of the front piece of cardstock. It can be as large or as small as you like, depending on what image you wish to put inside.


4. Place some adhesive on the outer edges of the cardstock. Join the front and back sections together to create the diorama card base.


5. Now you can decorate the card as desired.

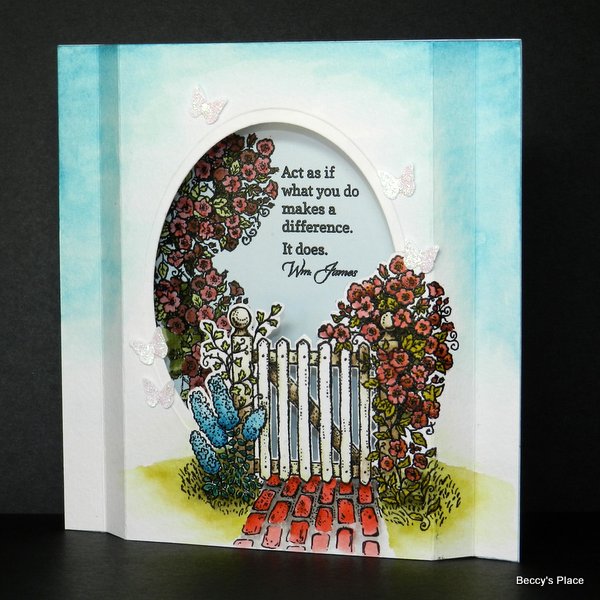
I have written some instructions for creating the card pictured above. Although it is the same basic design, you will actually do most of the decorating before assembling the card.
1. Cut two pieces of cardstock measuring 6" x 6". Score both pieces at 1/2", 1", 5" and 51/2" and set the bottom piece aside. Stamp your image on the front of the card, slightly off centre. (I heat embossed a beautiful Flourishes stamp featuring a garden gate.)

2. Decide on the shape and size of your window. I used an oval die and positioned it in the centre front of the card.

3. Use a pencil to mark the position of the die in relation to the image you stamped. These guide lines will show you where to cut and where to position the die again when you're ready to make the window.


4. Colour the image as desired making sure you take the colour right to the edges of the cardstock.

5. In order to slip the die under the image, you need to cut around the area you marked. Use a craft knife and a small pair of scissors and cut a little beyond the pencil marks.

6. Your die should now fit nicely behind the image so that when you run it through your cutting machine it will not cut the image.

7. Use a small pair of scissors to neaten up the edges around your image.


8. Now it's time to work on the back of the card. Line up the front and back pieces and use a pencil to draw a guide line around the window so you know where to place the elements. Stamp a sentiment and image in the desired place and colour the image.

9. Use some double sided tape or glue to join the front and back sections together and your card is done.
17 comments:
Beccy, this is beautiful! xx
Fabulous card, and a great tutorial...on my wish list to do.
Great tutorial ... thank you
Beautiful card, love the tutorial!
This is beautiful - thank you for the tutorial. I've always wondered how this type of card was made - thank you for showing it step by step! Wishing you a great day!
KT Fit Kitty
http://ktdesigns2013.blogspot.ca/
P.S. I have candy on my blog :-)
Thanks a million for the super video. I'll give it a whirl. Your card is awsome!!
Thank you--how pretty.
This is gorgeous. Thanks for the tutorial and great photos showing how to make it.
BEAUTIFUL! Thank you for the tutorial.
Pam
scrap-n-sewgranny.blogspot.com
This is beautiful - thank you for the tutorial.
Hugs Danica
Great tutorial and beautiful card. Thanks for sharing.
Hugs Malin
Wow, I have to try this! Thanks for sharing. :-)
Beautiful card Beccy,thanks for the tutorial!
hugs
Glenda
I´ve made a christmas card with this tutorial...thanks!
If you wanna take a look, welcome here...
http://www.cri-kee76.blogspot.se/2013/08/scrapbutikens-julkortsutmaning-nr-2.html
Just fabulous Beccy, thanks so much for the tutorial also :) Viv xx
This is gorgeous buy I don't understand how to die cut the center shape without cutting through the image. Can someone help?
Hi. You might find it easier to cut the centre shape and then add the image over the top later. Just stamp the image on a separate piece of card stock, colour and then cut out. It can be glued or taped over the edge of the window for the same effect.
Good luck!
Cheers,
Beccy
Post a Comment